-
Step 1: Per the previous guide Step By Step - Install and
Configure Git you should be in Visual Studio Code on the home screen.
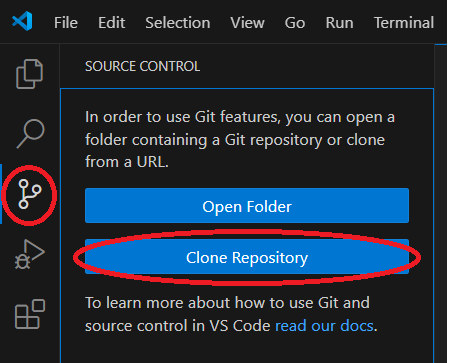
Once you launch Visual Studio Code, if you navigate to the “Source Control” option on the left
menu, you should see an option to clone a repository. This means Git was successfully installed
and Visual Studio Code acknowledges the installation. Click the “Clone Repository” button.
-
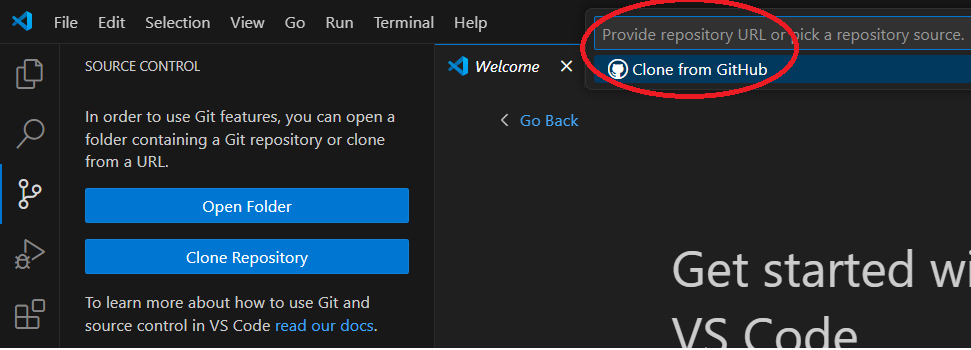
Step 2: You should see the cursor move to the top center of the screen. Click the
"Clone from GitHub" option.
-
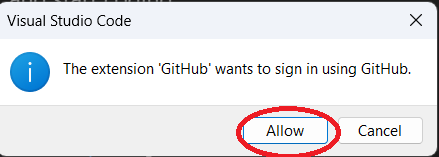
Step 3: You should be prompted with a box asking you to confirm that you are allowing
the GitHub extension to sign into GitHub. Click "Allow."
-
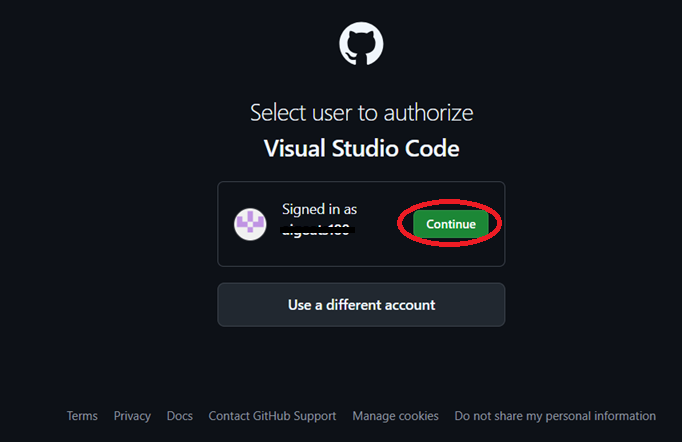
Step 4: You should see a new browser window appear asking you to confirm this action
on the GitHub side. Click "Continue." Note if you do not see this window appear, you may need
to sign into GitHub on your default browser first, and then repeate the steps above in
Visual Studio Code again.
-
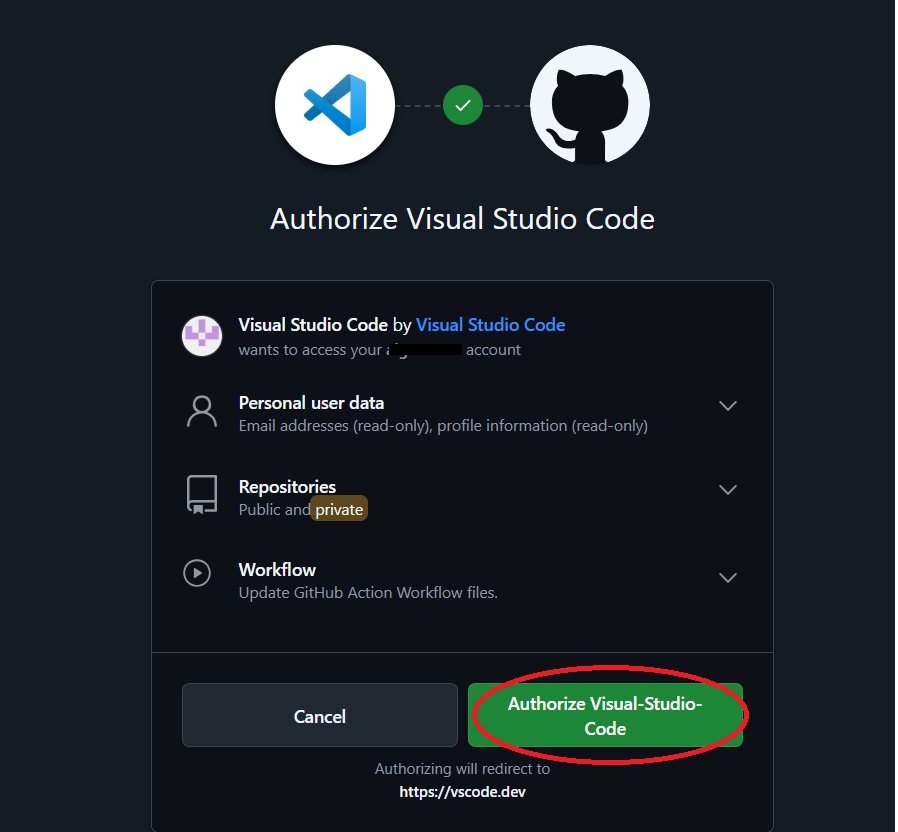
Step 5: You should see another GitHub screen appear that asks for additional confirmation
information. You can change these settings, but the author kept the defaults. Click the
"Authorize Visual-Studio-Code" button.
-
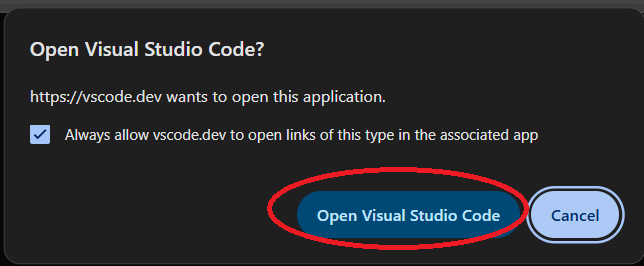
Step 6: You may be prompted to allow Visual Studio Code to open. Check the box and click
"Open Visual Studio Code."
-
Step 7: You should be taken back to Visual Studio Code, and you should now see your
repository show up per the screenshot below. If you do not see this come up, or if Visual
Studio Code seems to "hang" and does not show the link to your repo, try closing and
re-opening Visual Studio Code and clicking the "Clone Repository" button again to see if
that fixes the issue.

-
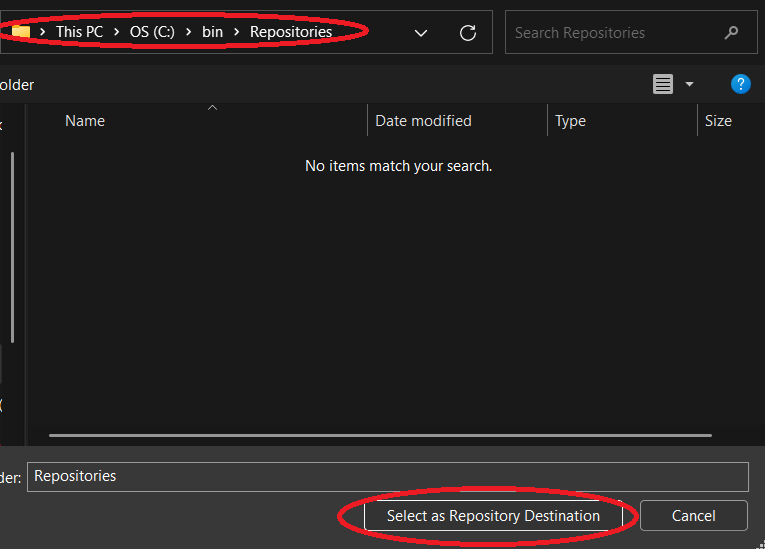
Step 8: If you click the link of your repository, a screen should come up asking you
which folder you want to store the data in. Note: you can make your own repository folder
somewhere on your machine if you want to keep your code in one specific location.
The author created a "Repositories" folder in his local drive. Click the "Select as Repository
Destination" button.
-
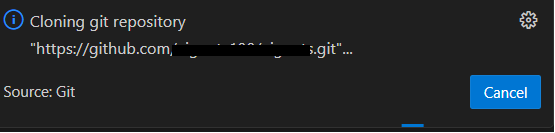
Step 9: You should see a window appear on the bottom right of Visual Studio Code
indicating it is trying to copy the repository.
-
Step 10: You will be prompted to sign in to proceed. Click the "Sign in with your browser"
option.

-
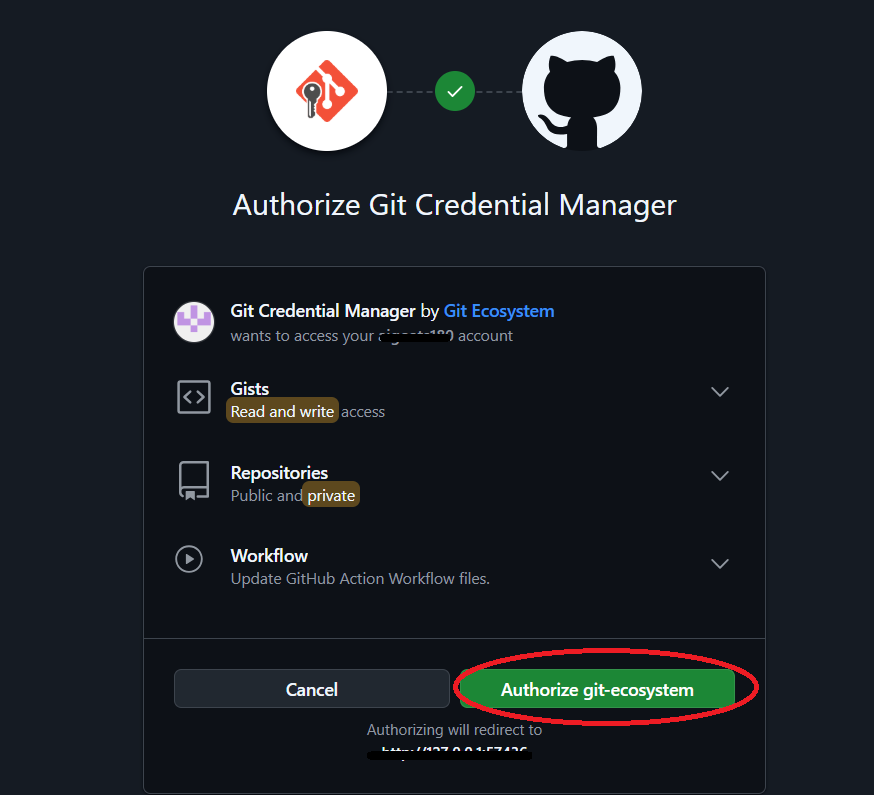
Step 11: A new browser window will open and you will be prompted with a screen similar
to what you have seen before. The author left the default settings. Click the "Authorize
git-ecosystem" button. Troubleshooting if you do not see this screen, it may mean
that you have previously signed into GitHub. If you have, these credentials will be
"saved" to your machine, and you will get an error code if you try to clone a private
repository from any other GitHub account. The error will say "repository not found."
To fix this, search for "Credential Manager" on your laptop. Go to "Windows Credentials"
and remove any credentials related to Git, then try again.
-
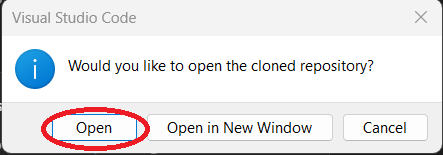
Step 12: You will be prompted to open the cloned repository. Click the "Open" button.
-
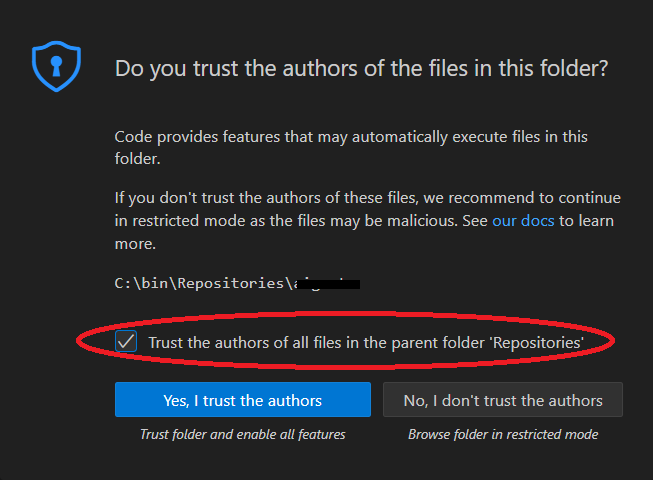
Step 13: You may be prompted to confirm you trust the author of the repository.
The author checked the box that says "Trust the authors of all files…" Click the "Yes,
I trust the authors" button..
-
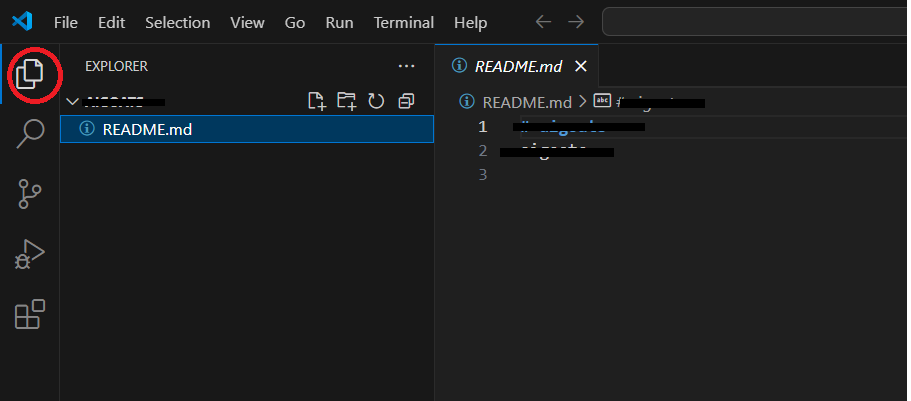
Step 14: If you click the "Explorer" button on the top right menu, you should see a
README.md file show up. This is the README.md file from the repository you created in GitHub
when you created your first repository.
-
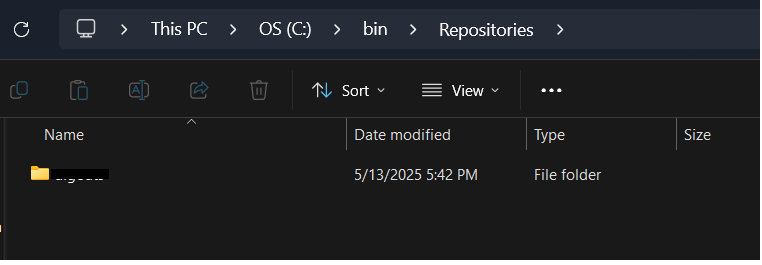
Step 15: You should also see a new folder in the "Repositories" folder or whichever
folder you chose to store the repository copy in. You have now successfully pulled / copied
a code repository from GitHub. Next, you will configure Visual Studio Code and Git to
allow you to push new code / changed code from your local machine back to GitHub.
-
Step 16: First, create a new file in your local repository that you will push back
to GitHub. Assuming you are still in the Explorer view, click the "New file…" button
and type in "Index.html."

-
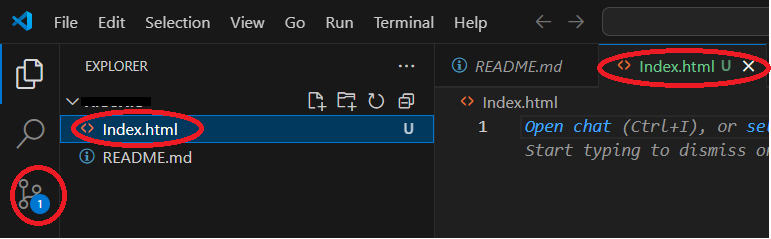
Step 17: You should see the new file show up. You should also see a new tab show up with
the file in it. Finally, you should see a "1" appear in the "Source Control" menu option on the
right side, indicating that you have made a change to your local repository that has not
been pushed back to GitHub. In later Step By Step guides, you will use this Index.html file
to create a simple "Hello World" website. Note: application development is beyond the scope
of this guide. There are many sites available on the internet that can provide details on
how to create a simple "Hello World" index.html file if you need help. The author generated
an image file using an AI image generator that the html file references. If you do not
want to use an image file, feel free to skip this step, but having the index.html file
reference an image file will be used in future Step by Step guides. If you generate a file,
just place it in your local folder. The author put it in the bin/Repositories/"repositoryname"
folder. When you place that image file into your folder, it will show up as an object in
Visual Studio Code so you can commit it, just like any other file.
-
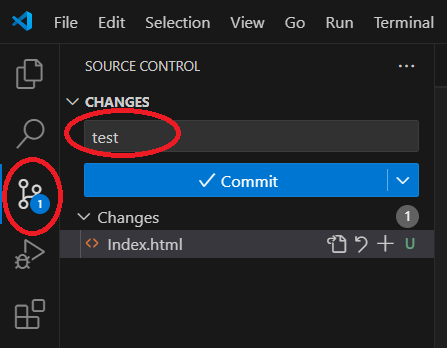
Step 18: As a test, if you navigate to the "Source Control" menu option on the right side,
you can enter a message such as "test" in the Changes box highlighted below.
-
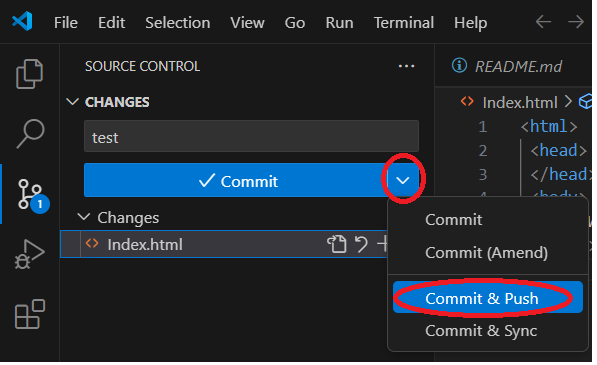
Step 19: You can now click the drop down arrow next to the "Commit" button and choose
"Commit & Push" to try to push your new file to GitHub.
-
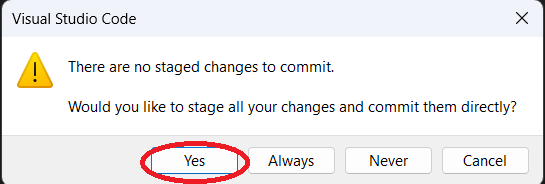
Step 20: You may be prompted to confirm it you want to stage all your changes and
commit them, click the "Yes" button.
-
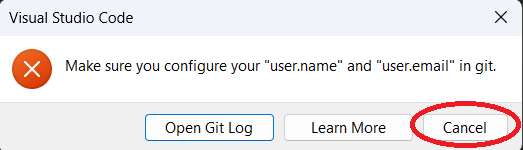
Step 21: You should get a popup indicating that you have not configured your user.name
and user.email in Git, so Visual Studio Code cannot commit your changes. The steps below
will fix this. Click the "Cancel" button.
-
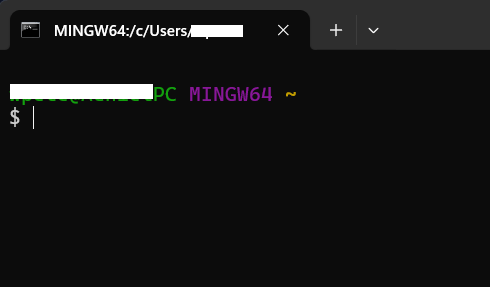
Step 22: To configure your GitHub user.name, first, open GitBash. You can use the search
functions on your computer to find the application if needed. You should see a screen similar
to the one below.
-
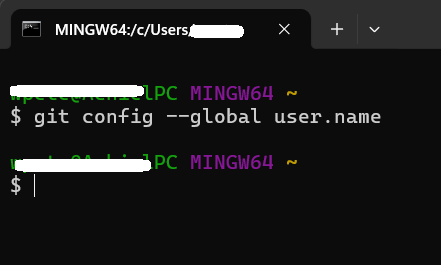
Step 23: Run the command (git config --global user.name) shown below in GitBash.
You should see a blank result, indicating that you have not yet set a user.name.
Note, the author has put a screenshot of the command below.
-
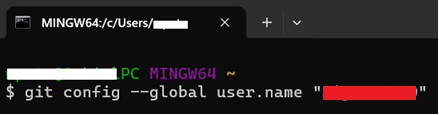
Step 24: To set your user.name, run the command git config --global user.name "yourusername"
shown below in GitBash, replacing the content between the "" (red bar in the screenshot below)
with your username in GitHub.
-
Step 25: If you do not recall your user.name, log into GitHub and click the icon on the
top right of your screen; a menu will pop out with your username at the top.

-
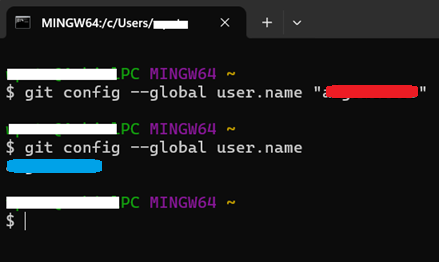
Step 26: Once you run this command, you should rerun the previous command to ensure the
user.name was accepted. See the screenshot below. Note the user.name in the command on the first
line (red bar between the "") is the same as the user.name (blue bar beneath the $ git config
command).
-
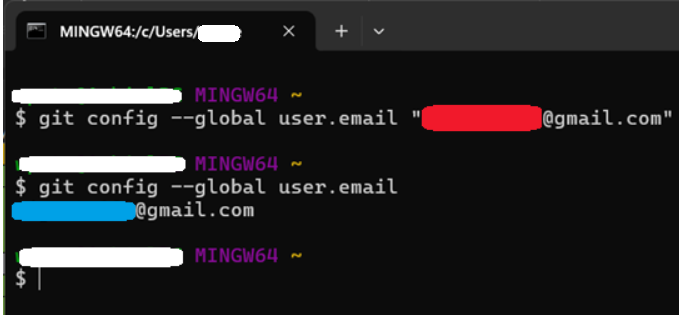
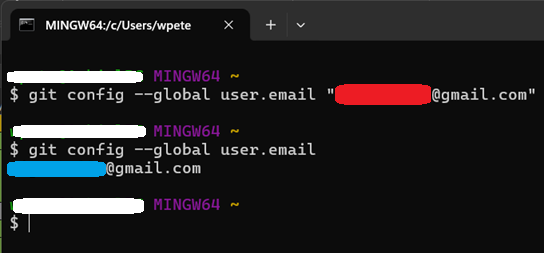
Step 27: Now that the user.name is set, you need to set the user.email field. You
will need to set the same email address you used to set up the GitHub account. See the
screenshot below. As with the user.name above, you should use the command to confim that
the user.email is set.
-
Step 28: You can now repeat the steps above to using the "Commit & Push" command,
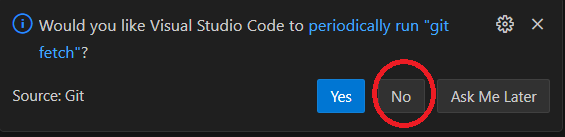
and it should push the changes without error. You may be prompted with the prompt below.
The author chose "No."
-
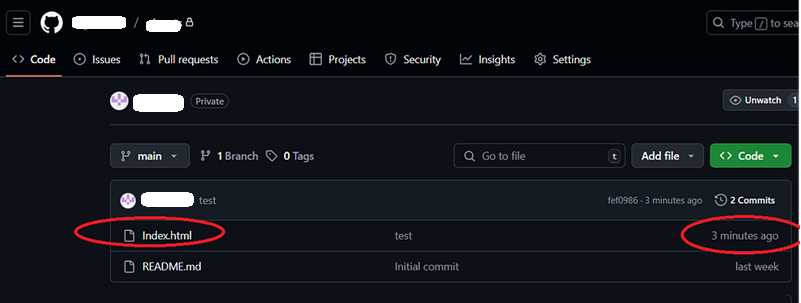
Step 29: You can confirm that the push worked by checking GitHub. Log into GitHub and
you should see the index.html file in GitHub, and you should see that it was just committed
a few minutes ago.
-
Step 30: While you can now push changes to GitHib, there is a security risk, since
you are using your email. You can use an "anonymous email" to prevent email address exposure.
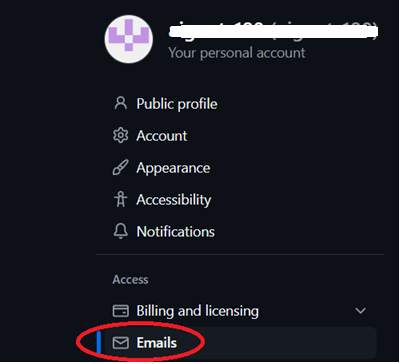
The steps below cover how to set this up. Go to GitHub, click the icon on the top right,
and select the "Settings" option.

-
Step 31: On the left side menu, click the "Emails" option.
-
Step 32: Scroll down until you find the section that says "Keep my email address private."
You will need to check this box. Once you check the box, you should scroll down again,
and you should see a second box appear that is checked by default. Now, copy the email
address shown in the red circle below. You will need to configure this email in GitBash.

-
Step 33: Go back into GitBash, and set the email address to the anonymous email address
you copied from GitHub.
-
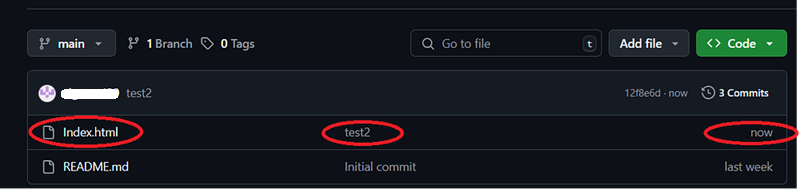
Step 34: Go into Visual Studio Code, and make a change to the index.html file and
save that change. As before, you should see a "1" appear on the "Source Control" menu bar
on the left side of the screen. Add a comment as you did previously (the author used "test2").
Then, use the "Commit and Push" command to push the changes to GitHub. You should see the
changes in GitHub.
-
Step 35: Now that you have configured Visual Studio Code to pull and push changes
to GitHub, you can start development work. Additional step by step guides will show you
how to install a programing language (the author uses Python) how to set up an AWS account,
how to connect your AWS account to Visual Studio Code, etc. These guides can be found in
the main Step By Step Guides page.